In first part of this article I’ve answered two major questions related to microfrontend architecture — what is it and what is it for. From now on this article focuses on how is it done. This part in particular covers general overview of technical solutions that support microfrontends and explains how does it work from end user’s perspective.

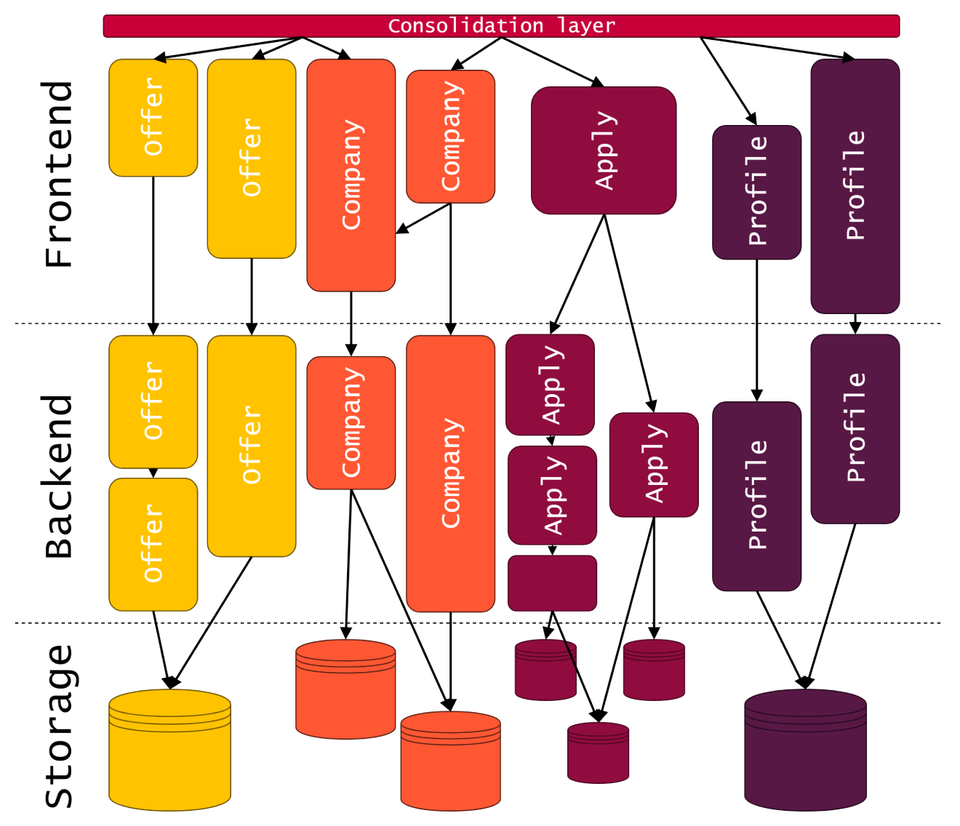
Let’s start with this diagram you’ve seen in part one, specifically with composition layer that is on top of it. In literature you’ll find it often referred to as Container Application. Its main purpose is to recognize which view is expected by the user, what elements is it built from, compose it from separate micro applications, and serve it. This task could be accomplished in variety of ways, each having its pros and cons.
Build-time integration
In our transformation from monolith to microfrontends, initially we integrated them during build time. It means that all separate micro applications were downloaded and integrated into Container Application during its build process, and it was then deployed as a whole to each and every environment.
In order to make it happen during first steps of the transformation, we went for the easiest solution we could imagine: we treated our monolith as Container Application and used NPM to do the job of downloading and integrating packages for us. We created a module named Node Package Provider, put package.json file in it, and listed all our microfrontends as dependencies.
Then, we created a step in build plan of the monolith, in which program literally entered Node Package Provider directory and run npm install script in it. We published all separate applications to our local package repository and configured Node Package Provider so that it can access them. All packages were installed within this directory and were later injected on specific views with reference to it.
This solution was cool, because it let us quickly move on to creating actual microfrontends instead of spending too much time on setting up some sophisticated integration processes. It had, however, some obvious issues, and was treated as temporary solution from the very beginning. Main pain point of this technique was that in order to update one of our microfrontends we had to publish new version, update reference in the monolith, and publish new version of the monolith.
Other issues were related to versioning of these packages or the fact that they had to be prepared in specific way — in order to avoid installing their dependencies we were forced to keep them all as devDependencies, which was obscuring and inconvenient.
Because of this, even though I keep referring to our applications created back then as “microfrontends”, they were not microfrontends by definition I provided at the beginning of this article — they were separate and independent, but not in terms of deployment. Their actual deployment was always directly related to deployment of the monolith.
Generally speaking, if we go by definition of microfrontend as independently deployable piece of user interface (among other characteristics), build-time integration is not applicable. However, it is cool way to kick start this kind of transformation, focus on coding actual applications, and move them to run-time integration later.
Run-time integration
Once all issues of build-time integration became too painful to ignore, we started moving towards run-time integration. In this approach our microfrontends were fully independent in deployment and downloaded to our user’s machine once he accessed certain view in which they were incorporated.
One of the most commonly advised techniques to compose template on the server side would be using Server-Side Includes — feature that is available in majority of web servers. Here you can see basic example with pure HTML template and variable part that is going to be included by the server.
<html lang="en" dir="ltr">
  <head>
    <meta charset="utf-8"/>
    <title>Title</title>
  </head>
  <body>
    <h1>Header</h1>
    <!--# include file="$PAGE.html" -->
  </body>
</html>
Here is Nginx server configuration ready to set that variable, populate the template, and serve it to the user.
server {
  listen 8080;
  server_name localhost;

  root /usr/share/nginx/html;
  index index.html;
  ssi on;

  rewrite ^/$ http://localhost:8080/page1 redirect;

  location /page1 { set $PAGE 'page1'; }
  location /page2 { set $PAGE 'page2'; }
  location /page3 { set $PAGE 'page3'; }
}
However, we’ve never used this technique, as it would require building new Container Application, and it was way too early for that. Instead, we still used monolith for this purpose, but we ditched Node Package Provider, deployed our microfrontends to separate Content Delivery Network, and linked them with monolith via simple URLs representing their actual locations. Thanks to this, we finally could replace a piece of user interface without need for deployment of monolith.
This solution worked for us for quite some time, and still works in some parts of the application. It’s nice and simple, but doesn’t scale very well, and doesn’t help us get rid of monolith in any way. In order to do that, eventually we needed to build brand new Container Application.
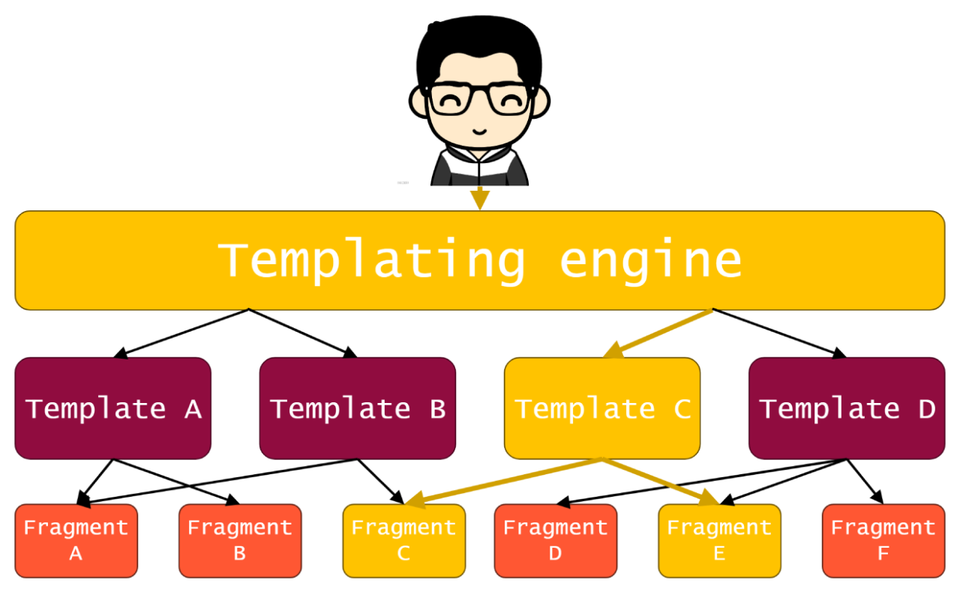
For that purpose, we went for heavily modified version of open source library Tailor created by Zalando. It lets us define all routes, templates, and fragments in simple and convenient configuration files, which we can split and maintain separately. We called it Templating Engine and established it as main entry point to our application for parts that are already migrated to this approach. Here’s how it works.

Whenever user enters our website, the request is passed to Templating Engine, which, based on request URL, recognizes which template is expected by the user, loads it, and then populates it with content of corresponding microfrontends.
Here you can see example of route to template mapping. When our user goes to one of these URLs, Templating Engine will load corresponding template.
routeMap:
  "/": "/index.html"
  "/thiscompany": "/companyHub/pages/thisCompany.html"
  "/jobs": "/companyHub/pages/jobs.html"
  "/contacts": "/companyHub/pages/contacts.html"
  "/reviews": "/companyHub/pages/reviews.html"
Here is exemplary template. As you can see, most of the time it’s just collection of fragments, each representing separate microfrontend. Each fragment can have some configuration provided here, but most importantly — a unique ID.
<fragment id="ch-background-image" slot="ch-background-image" timeout="30000" async=""/>
<fragment id="ch-meta-data-header" slot="ch-header" timeout="30000" async=""/>
<fragment id="ch-jobs" slot="ch-block-main" timeout="30000"/>
<fragment id="ch-assets" slot="ch-block-end" timeout="30000" async=""/>
Finally, there is a map of fragment IDs to their actual locations. When certain template is loaded, Templating Engine loads each microfrontend from its location, and replaces corresponding fragments with them.
fragments:
  ch-assets: http://localhost:8080/assetslinks

  ch-background-image: http://localhost:8080/v1/background
    /companyId/{companyId}/lang/{langName}/?{additionalParams}

  ch-jobs: http://localhost:8080/v1/jobs/companyId/{companyId}
    /lang/{langName}/?{additionalParams}

  ch-meta-data-header: http://localhost:8080/v1/header
    /companyId/{companyId}/lang/{langName}/?{additionalParams}
We’ve created this tool also due to the fact that in reality there are other, common tasks that could be taken care of on this level instead of delegating them to each separate micro application. List of such tasks include, but is not limited to attaching common, shared libraries to each page, collecting and sending basic tracking data related to specific route taken by the user, or passing around information about A/B tests that user is in.
Beneath Templating Engine, we have separate microfrontends, which, besides being loaded and displayed, sometimes also need to communicate with one another. This need can be satisfied in variety of ways.
Communication between microfrontends with publisher and subscriber
For example, we are currently using simple JavaScript library named PubSubJS, which implements well-known pattern of “publisher and subscriber”. In this example of implementation, you can see that we import this library along with list of messages from our repository of packages. Then there is React component, which represents login modal for our users. Once it is mounted on the page, it subscribes for specific message, and will behave in certain way whenever such message is published.
import {
  PubSub,
  CANDIDATE_PROFILE_EVENTS,
} from '@stepstone/pub-sub';

class LoginModal extends React.Component {
  public componentDidMount() {
    PubSub.subscribe(
      CANDIDATE_PROFILE_EVENTS.SHOW_LOGIN_MODAL,
      (msg, data) => { /* ... */ }
    );
  }
}
Here, on the other hand, is example of message publication. Whenever such line of code is invoked by one of our microfrontends, if login modal is present on the same page, it will be triggered and displayed.
PubSub.publish('CANDIDATE_PROFILE_SHOW_LOGIN_MODAL');As a matter of fact, you can type this exact line of code in JavaScript console while you’re on one of our homepages, for example stepstone.de. Due to the fact that this API is exposed globally in window object, you’ll see this behavior in action. This, in turn, can come handy for example for testing purposes.
Truth is that separate library for “publisher and subscriber” is not needed anymore, given current state of commonly available APIs in our browsers. This exact pattern is utilized in JavaScript for years now — common events, such as click or hover, work exactly the same way, they’re just named differently: there are elements that listen for the event instead of subscribing for messages, and there are elements that dispatch events instead of publishing messages.
Having access to powerful API named CustomEvent, which is now supported in all major browsers, one can recreate the same communication method without need for PubSubJS or any other library, like in this example.
element.addEventListener(
  'myEvent',
  (msg, data) => { /* ... */ }
);

element.dispatchEvent(
  new CustomEvent('myEvent')
);
Communication between microfrontends with shared state
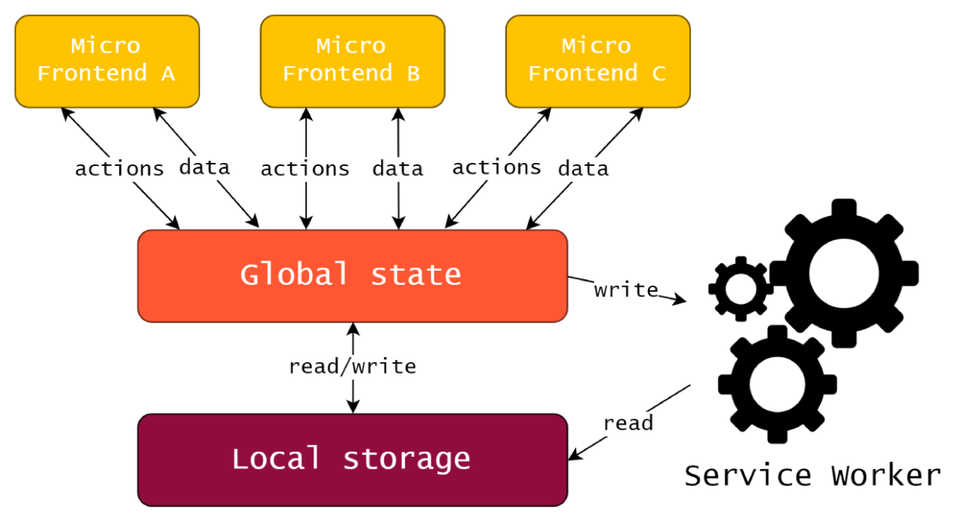
Another idea to enable interactions between separate microfrontends within one view would be to use some shared, global state, possibly implemented with the help of some library, such as Redux. Some of our applications use Redux anyway, and some that don’t usually are simple enough to have no need for communication with others, so it wouldn’t be much of an overkill.
Having one, shared state per view comes with some very handy features — for example, applications can use it not only for communication purposes, but also to store shared data instead of each one having its own copies inside, which is quite common , especially when it comes to the most basic entities, such as user ID. Such state could be put in local storage on user’s computer when he leaves our page, and taken from there when he comes back, so that he has the application in exactly the same shape as he left it. Add some service workers on top of it and you’re only one step away from having your application being fully functional even when user is offline.

That sounds awesome to us, but it’s still purely theoretical argument — we’ve not tested this approach in any way yet. We’re pondering with this idea, because added value could be massive, but it’s always a trade-off. Simple implementation like PubSubJS we’re using comes with minimal amount of code shared across teams and very little need for maintenance, while global, shared state based on some specific technology would come with much more extensive implications for present and future development.
Why Redux, though? After all, they say that you can replace it entirely with React Hooks and Context API. Well, it might be true within single React application, but given the fact that our views are composed from several separate applications of such kind, we have not found a way to make them use one state given those tools (although it seems to be possible to accomplish with an addition of ReactN library). Redux, on the other hand, is not coupled with React by definition, can be instantiated separately, and easily provided to all React apps within same page.
This article is published in installments, and here’s where second one of them ends. In the next part you’ll read about the way we’re creating microfrontends, tools and processes that help us take control over such distributed system.

